Getting Started
NullReport is a self-hosted, AI-assisted penetration test report generator. You write your sections, track structured findings with CVSS, and export a polished, branded DOCX, all from one Docker stack on your own infrastructure.
Prerequisites
- Docker with Compose v2. It runs on Linux, macOS, and Windows. On Linux, install Docker Engine and the Compose plugin; on macOS or Windows, Docker Desktop includes both (use WSL on Windows to run the installer).
curl.
Install
Run the installer (add LICENSE_KEY for a paid tier):
- Free
- Pro / Team
curl -fsSL https://raw.githubusercontent.com/nullreport/install/main/install.sh | sh
curl -fsSL https://raw.githubusercontent.com/nullreport/install/main/install.sh | LICENSE_KEY=NR-xxxxxxxx sh
Just pass your key; the installer checks the license server and pulls the matching
tier (Pro or Team) for you. The variable goes after the pipe, on sh. If you
run the free command in a terminal without a key, the installer also asks for one.
NullReport runs on Windows, the installer is just a shell script, so run it from a Linux shell rather than PowerShell. Install Docker Desktop (it sets up WSL2 automatically), then open the WSL / Ubuntu terminal — or Git Bash — and run the exact same command above. Nothing else is Windows-specific, and there's nothing extra to download beyond Docker Desktop. Afterwards open http://localhost:3000 in your normal Windows browser.
The installer checks for Docker, creates a nullreport/ folder, generates secrets into a .env
file, pulls the images for your tier, and starts three containers: the web app, the backend API,
and Postgres. Only the web app is published, on port 3000; the backend and database stay on the
internal Docker network, and the web app proxies API calls to the backend. It also offers to bundle
Ollama for local AI (see below). First boot runs the database
setup, so give it about twenty seconds, then open http://localhost:3000.
Optional settings go on the sh at the end of the command (a variable placed
before curl is handed to curl, not to the installer, so it is ignored):
| Variable | Does | Default |
|---|---|---|
LICENSE_KEY | Your license key. Pro vs Team is read from the license server | empty |
TIER | Image tier, auto-detected (free without a key, otherwise from the server). You don't normally set this | auto |
NULLREPORT_DIR | Install folder | ./nullreport |
FRONTEND_PORT | The port the app is served on | 3000 |
WITH_OLLAMA | 1 bundles local AI without asking | prompt |
The installer writes JWT_SECRET, ENCRYPTION_KEY, and POSTGRES_PASSWORD into
nullreport/.env on first run and never rotates them, because rotating ENCRYPTION_KEY would
make already-encrypted data (like stored AI keys) unreadable. Back this file up with your data
and never commit it anywhere.
Changing settings later
To change a setting after installing, open nullreport/.env in the install folder, edit the
value, and run docker compose up -d to apply it.
- Fine to change any time: the port (
FRONTEND_PORT) and your license key (LICENSE_KEY). If you change the port, also setFRONTEND_URLto the new address (for exampleFRONTEND_URL=http://localhost:8080) so links keep working. To change your tier, re-run the installer (below) rather than hand-editing.env, so the matching image is pulled. - Do not change:
JWT_SECRET,ENCRYPTION_KEY, andPOSTGRES_PASSWORD. These are set once.ENCRYPTION_KEYis what scrambles your saved AI keys, so changing it makes them unreadable. If you ever truly need new secrets, start over with a fresh install and back up your data first.
First login
- The installer generates the first-run
adminpassword and prints it when it finishes, on theLog in as admin / …line. Save it. (Installed by hand instead? The backend then generates the password itself and prints it to the logs once; from the install folder, grab it withdocker compose logs backend | grep -A1 "First run detected". To pin a known password either way, setADMIN_INITIAL_PASSWORDinnullreport/.envbefore the first boot.) - Open http://localhost:3000 and log in:
- Username:
admin - Password: the value the installer printed (or, for a manual install, the value from the logs)
- Username:
- You're immediately required to set a new password (minimum 6 characters). This only happens once.
- You land on the Reports dashboard, already populated with a demo report so you have something to explore.
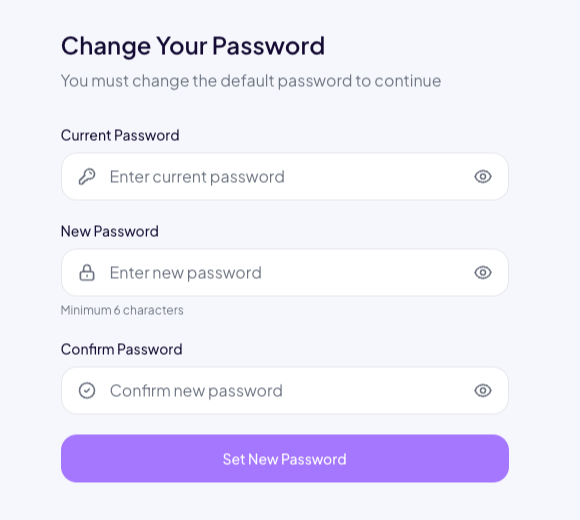
The first-run password is shown once, by the installer (and in the logs). Save it somewhere safe, complete the forced change on first login, and don't expose the app to the internet without a reverse proxy and TLS in front of it (see Access it from other machines).
Activate a paid tier
First, choose a plan and check out on the website. Right after
payment you receive your license key (it looks like NR-xxxxxxxx) by email, and it's always
available in the customer portal.
Licensing is then driven by the LICENSE_KEY environment variable. There is no in-app field for it.
If you installed with LICENSE_KEY set, you're already done. To upgrade an existing install after
purchasing, re-run the installer with your key, from the same folder you installed into:
cd ~ && curl -fsSL https://raw.githubusercontent.com/nullreport/install/main/install.sh | LICENSE_KEY=NR-xxxxxxxx sh
It checks the license server for your tier (Pro or Team), pulls the matching image, and keeps your existing data and secrets. You don't choose the tier yourself; the server is the source of truth, so the same command works whether your key is Pro or Team.
On startup the backend activates the key against the license server, caches a signed token, and
unlocks the matching tier. Leaving LICENSE_KEY empty runs the free tier. Full details,
including the offline grace period and machine binding, live in Licensing.
Switching tier only swaps the app to the paid image. Your reports, findings, templates, users,
and uploaded images live in Docker volumes that the upgrade leaves alone, and your secrets stay in
the same .env, so nothing is migrated or rewritten. Upgrading simply unlocks the paid features
on the data you already have.
The one thing to get right: run the upgrade from the same folder you installed into (the
nullreport/ folder). That is what reuses your existing data. Running it from somewhere else, or
with a different NULLREPORT_DIR, starts a second, empty install instead. And never run
docker compose down -v, the one command that erases the volumes.
What ships out of the box
First boot seeds a working starting point:
- A demo report, "Example: Acme Corp Web App Pentest", with sections and findings so you can see a complete report immediately.
- A DOCX export template, the "Templating Showcase Template", ready to export against.
- One example finding template, SQL Injection, to show the format. Build your own library from there.
Quick walkthrough
The fastest path from zero to a finished report:
- 1. Create
- 2. Write
- 3. Findings
- 4. Export
From the Reports dashboard, click New Report, give it a title and client, pick the seeded report template, and click Create. See Reports.
On the Content tab, click a section in the sidebar and write in the rich-text editor. Add new sections by typing a name in Add Section. See Sections.
On the Findings tab, click Add Finding and start from the template browser or from scratch. Set severity, run the CVSS calculator, and fill in the fields. See Findings.
Click Export, choose your template, and download the DOCX. Empty fields trigger a warning you can dismiss. See Exporting.
Optional: local AI with Ollama
On Pro and Team, you can point the AI features at a local Ollama model instead of a cloud
key. On a paid install that doesn't already have it, the installer offers to bundle Ollama; say
yes, or set WITH_OLLAMA=1 to bundle it without being asked (and WITH_OLLAMA=0 to remove it).
Free installs aren't offered Ollama, since AI is a Pro/Team feature. Afterwards, open
Settings → AI → Ollama and click a model to download it.
Data, backups, and updates
Your data lives in two Docker volumes, and you should back up both (plus nullreport/.env):
| Volume | Holds |
|---|---|
db-data | The Postgres database (reports, findings, users, templates metadata) |
app-data (/data) | License cache, the machine instance ID, uploaded images, and DOCX template files |
To update, run the updater from anywhere (it finds your install folder, pulls the latest images for your tier, and restarts with your data intact):
curl -fsSL https://raw.githubusercontent.com/nullreport/install/main/update.sh | sh
Or, from the install folder: docker compose pull && docker compose up -d.
docker compose down -v deletes app-data, including the machine instance ID your license is
bound to. After that, re-activation fails until you click Deactivate machine in the license
portal. See Licensing.
Access it from other machines (a LAN or a domain)
By default NullReport is published only on http://localhost:<port> of the machine it runs on.
To let teammates reach it from their own machines, you give it an address they can open and tell
the app what that address is.
The one rule that trips people up: on any address other than localhost, logging in needs
HTTPS. The session cookie is marked Secure whenever FRONTEND_URL is an https:// address,
and browsers refuse to store a Secure cookie that arrives over plain http://. So over
http://<your-server-ip> the login screen appears to work but never sticks. localhost is the
only address browsers exempt from this.
You have two practical options. In both, set FRONTEND_URL in nullreport/.env to the exact
address people will use, then run docker compose up -d from the install folder to apply it. The
database and backend stay on the internal Docker network either way; only the web app's port is
exposed.
1. A domain with HTTPS (recommended for a team). Point a hostname at the server and put a reverse proxy in front that terminates TLS and forwards to the published port. Then:
# nullreport/.env
FRONTEND_URL=https://reports.yourcompany.com
A minimal Caddy config gets you automatic certificates:
reports.yourcompany.com {
    reverse_proxy localhost:3000
}
2. Plain HTTP on a trusted LAN (quick, but unencrypted). If the app is only reachable on a
local network you trust and you accept that the traffic is not encrypted, point FRONTEND_URL at
the server's address over http://. Because it isn't https://, the cookie is not marked
Secure, so login works:
# nullreport/.env
FRONTEND_URL=http://192.168.1.50:3000
Anyone on the network can read the traffic, so only do this on a network you trust, and never on the public internet.
What's next
- Reports for the dashboard and the report editor
- Sections for writing content in the rich-text editor
- Findings for severity, CVSS, and custom fields
- Finding Templates for your reusable vulnerability library
- Report Templates and Template Syntax for your own DOCX exports
- Users & Roles for team management (Team)
- Settings, Search & Navigation, Licensing, and Exporting